1 First, put some silicon or liquid soap on the toilet outlet
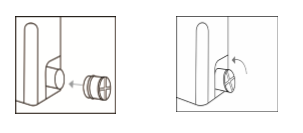
2 Fit the clamp (part B) supplied on the toilet* bowl outlet
3 Pull the flexible sleeve over the toilet* outlet
4 Position the metal clamp(Part B) over the edge of the flexible sleeve, and tighten with a screwdriver
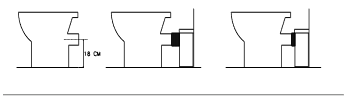
5 Once the appliance has been positioned, fix it to the floor using the 2 screws supplied (part F)
If using the two white mounting bolts (Part F), secure them to the macerator bottom before positioning the unit.
1 Macerator pump has 2 water inlets at both sides, which can be connected to the washing machine, wash basin, shower or any other sanitary devices.
2 The shower platform should be padded higher above the ground plane allowing a slope of the pipeline of 3% to the macerator inlet.
3 when connected to the external device, the head of Part D should be separated by a knife. Big head connect to machine, small head connect to pipe, the 2 places need to be fixed with Part C.
Connection of Discharge Pipework
When a discharge pipework with diameter 28 or 32mm is used, cut the elbow adaptor (part A) at the respective diameter. Then connect to discharge pipework to the elbow using the metal clamp(C) . Plug the other side of the elbow into the outlet of the macerator unit and fix with the 32-50mm metal clamp(Part C).

– Horizontal pipe runs must have a minimum fall of 1:200 (5mm per meter) to the soil stack.
– If a vertical lift is required, it must be made before the horizontal run at the start of the pipe run.
– We recommend that a drain-off point is installed to allow the discharge pipework

There should be no dripping of water from the toilet cistern or any other sanitary appliances. Dripping will cause the unit to activate repeatedly to pump the water away.
* When no other appliances need to be connected, use the supplied plugs to seal the unused(Part E).

to be drained down before any service work.
– If the discharge pipework runs to a level considerably lower than the unit, the resul tant syphoning effect can suck out the water seal in the unit. Fitting an air admittance valve at the high point of the pipe run will overcome this problem.
– The discharge pipework must be connected to the soil stack using an appropriate strap.
– Ensure all external pipework is adequately installed to avoid the possibility of freezing
– Any elbow on the discharge pipe of the unit will create friction loss (roughly 50 cm per elbow to be deducted from the vertical pumping spec. – Always use smooth bends (OR 2 X 45 degree bends together) and not 90 degree elbows.

The unit should be connected to a fully earthed electrical supply.